Introduction to rsyncrosim
Source: vignettes/rsyncrosim_vignette_basic.Rmd
rsyncrosim_vignette_basic.RmdThis vignette will cover the basics of using the rsyncrosim package within the SyncroSim software framework.
Overview of SyncroSim
SyncroSim is a software platform that helps you turn your data into forecasts. At the core of SyncroSim is an engine that automatically structures your existing data, regardless of its original format. SyncroSim transforms this structured data into forecasts by running it through a Pipeline of calculations (i.e. a suite of models). Finally, SyncroSim provides a rich interface to interact with your data and models, allowing you to explore and track the consequences of alternative “what-if” forecasting Scenarios. Within this software framework is the ability to use and create SyncroSim packages.
For more details consult the SyncroSim online documentation.
Overview of rsyncrosim
rsyncrosim is an R package designed to facilitate the development of modeling workflows for the SyncroSim software framework. Using the rsyncrosim interface, simulation models can be added and run through SyncroSim to transform Scenario-based datasets into model forecasts. This R package takes advantage of general features of SyncroSim, such as defining Scenarios with spatial or non-spatial inputs, running Monte Carlo simulations, and summarizing model outputs. rsyncrosim requires SyncroSim 2.2.13 or higher.
For more details consult the rsyncrosim CRAN documentation.
SyncroSim Package: helloworldTime
To demonstrate the utility of the rsyncrosim interface, we will be using the helloworldTime SyncroSim package. helloworldTime was designed to be a simple package to introduce timesteps to SyncroSim modeling workflows.
The package takes from the user 2 inputs, m and b, representing a slope and an intercept value. It then runs these input values through a linear model, y=mt+b, where t is time, and returns the y value as output.
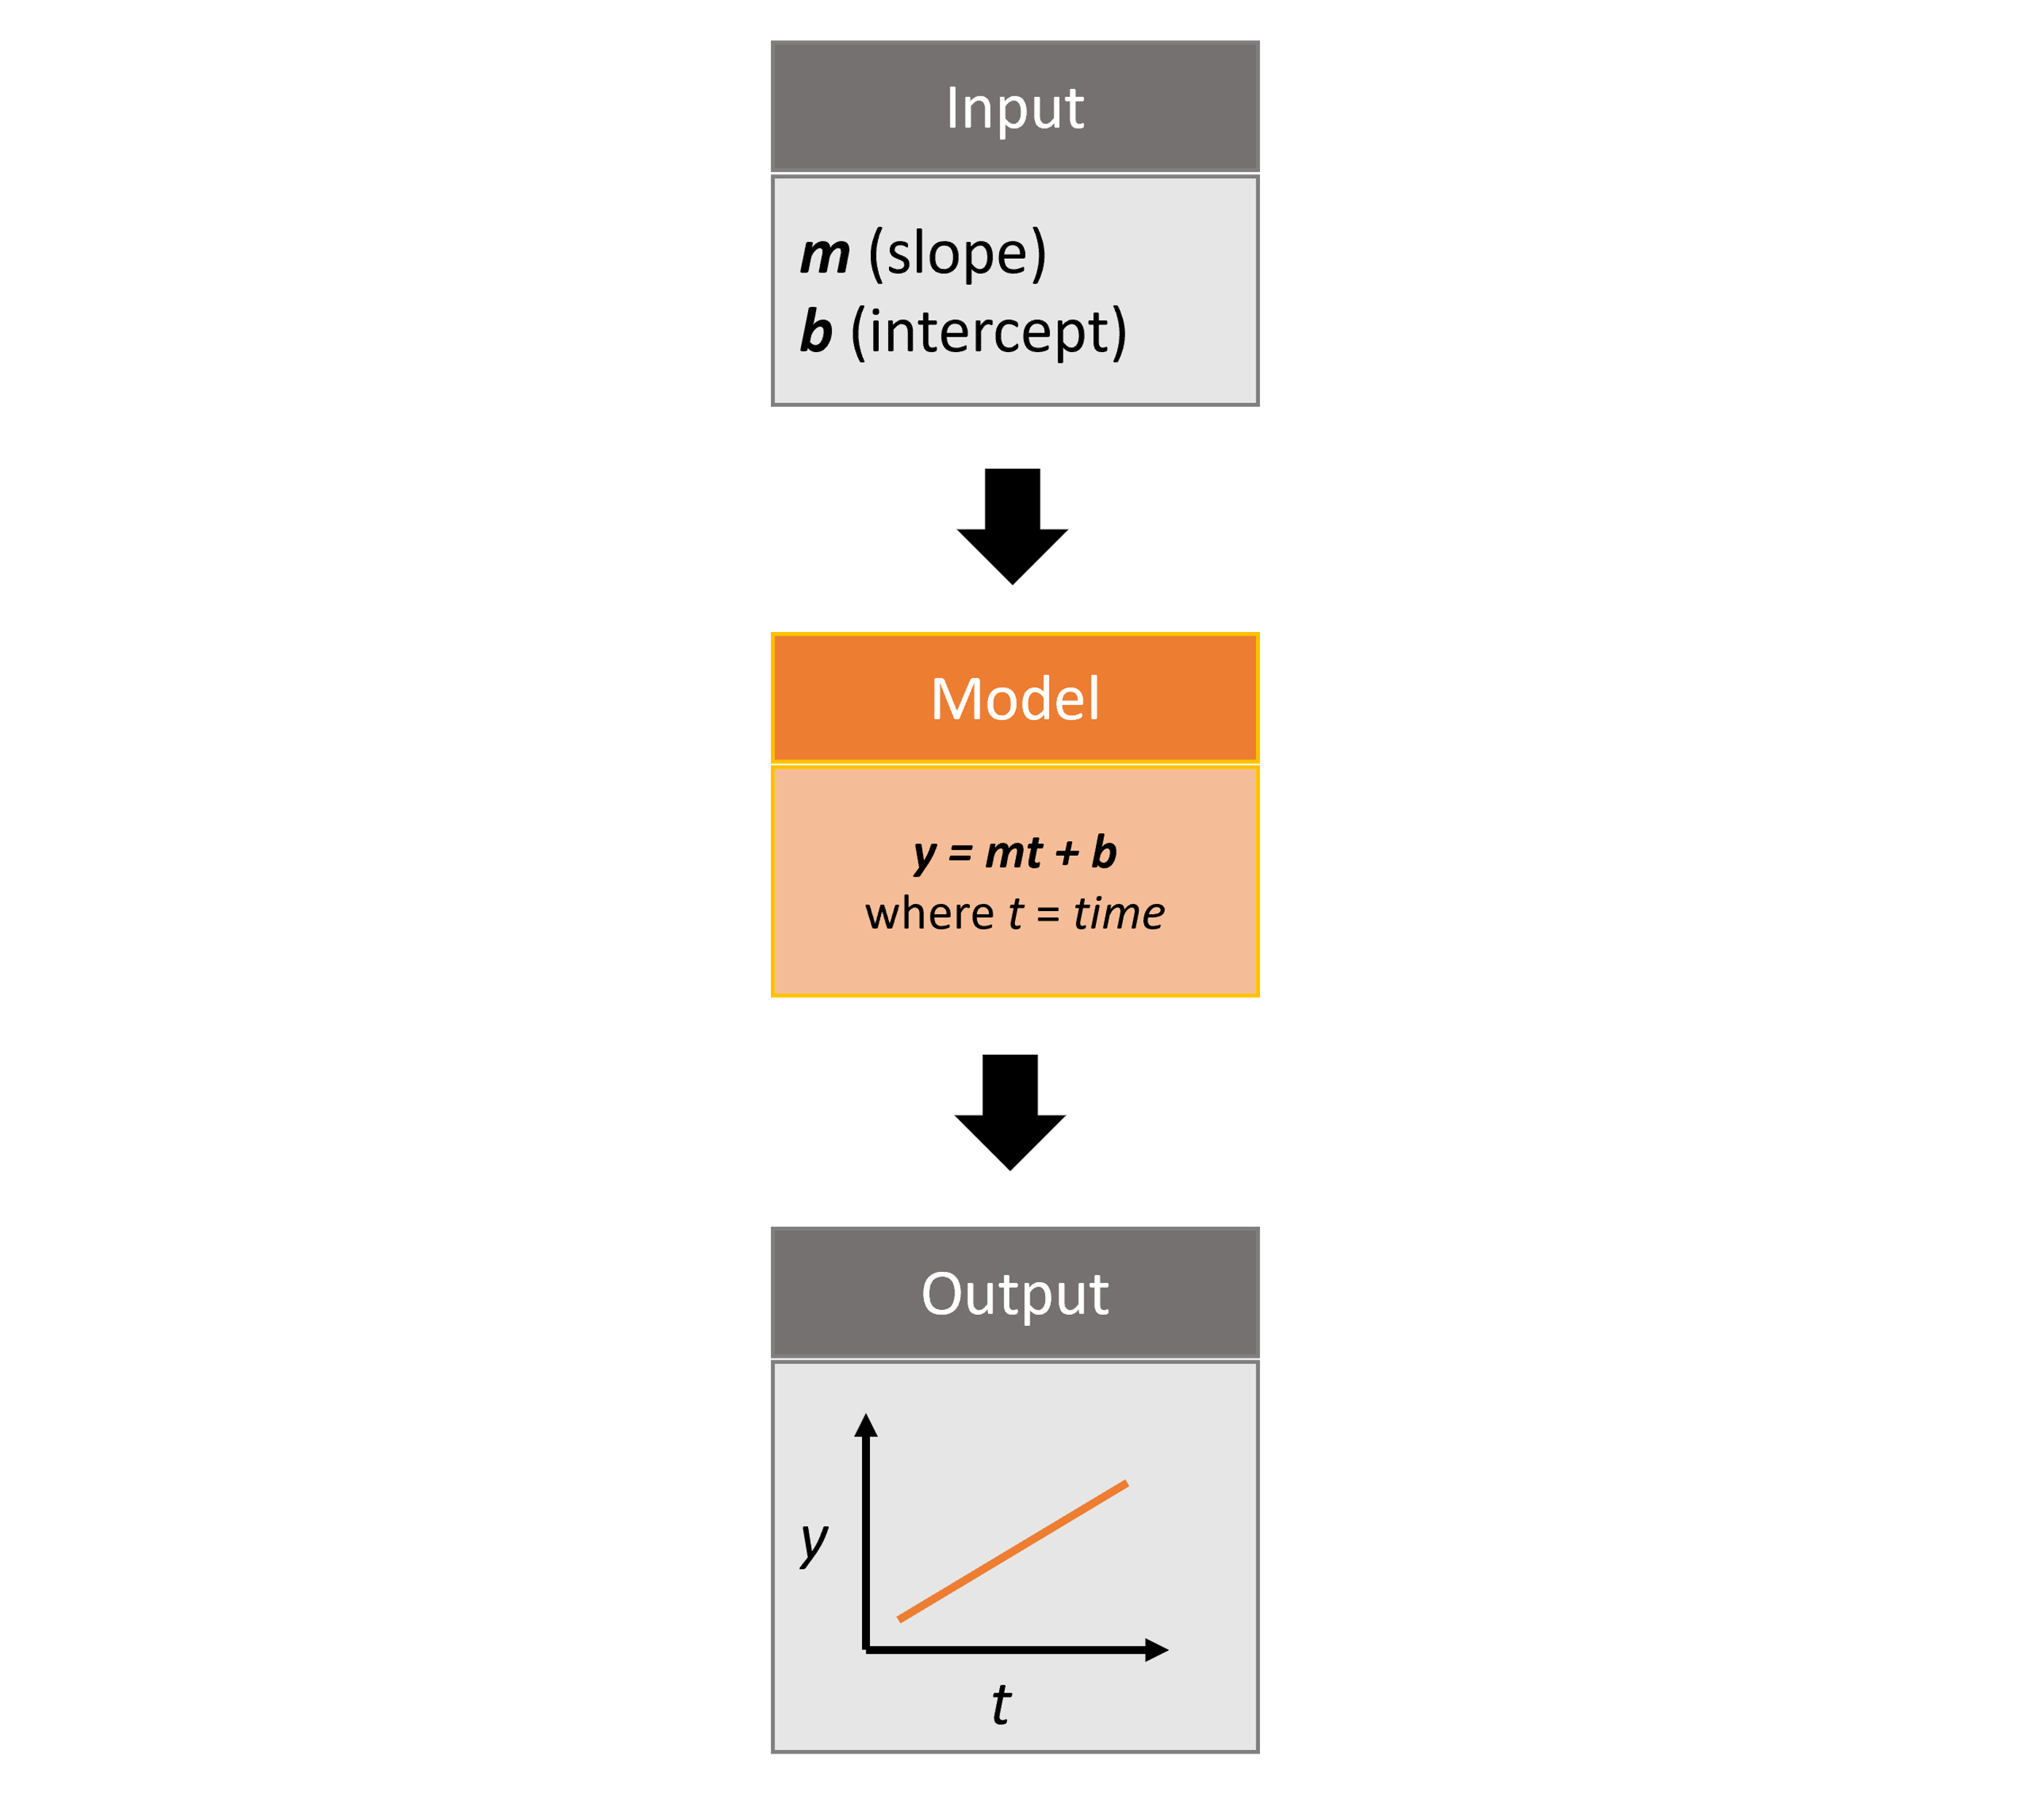
Infographic of helloworldTime package
For more details on the different features of the helloworldTime SyncroSim package, consult the SyncroSim Enhancing a Package: Adding Timesteps tutorial.
Setup
Install SyncroSim
Before using rsyncrosim you will first need to download and install the SyncroSim software. Versions of SyncroSim exist for both Windows and Linux.
Installing and loading R packages
You will need to install the rsyncrosim R package, either using CRAN or from the rsyncrosim GitHub repository. Versions of rsyncrosim are available for both Windows and Linux.
In a new R script, load the rsyncrosim package.
# Load R package for working with SyncroSim
library(rsyncrosim)
Installing SyncroSim packages using installPackage()
Check if the helloworldTime package is already installed. Use the package() function from rsyncrosim to first get a list of all currently installed packages in SyncroSim.
# Get list of installed packages
package()
## [1] name displayName version
## <0 rows> (or 0-length row.names)Currently we do not have any packages installed! To see which packages are available from the SyncroSim package server, you can use the installed = FALSE argument in the package() function.
##            name
## 1     demosales
## 2         dgsim
## 3           epi
## 4     epiDataBc
## 5 epiDataCanada
## 6  epiDataWorld
##                                                               description
## 1 Example SyncroSim Base Package of a very simple sales forecasting model
## 2                          Simulates demographics of wildlife populations
## 3                                                   Epidemic Base Package
## 4                                                        BC COVID-19 Data
## 5                                                  Canadian COVID-19 Data
## 6                                                     World COVID-19 Data
##   version
## 1   1.1.0
## 2   2.3.0
## 3   1.1.0
## 4   1.0.0
## 5   1.0.0
## 6   1.0.0
Install helloworldTime using the rynscrosim function installPackage(). This function takes a package name as input and then queries the SyncroSim package server for the specified package.
# Install helloworldTime
installPackage("helloworldTime")
## Package <helloworldTime> installedTo install the package from a .ssimpkg file on your local computer rather than installing directly from the server, you can use the installPackage() function with the filepath argument set to TRUE. Instead of using the package name as the argument, the file path to the .ssimpkg is used.
# Install helloworldTime using file path to ssimpkg file
installPackage("path/to/helloworldTime.ssimpkg")
Now helloworldTime should be included in the package list:
# Get list of installed packages
package()
## name description version
## 1 helloworldTime Example demonstrating how to use timesteps 1.0.0Note: you can also update installed packages using the updatePackage() function or delete installed packages using the uninstallPackage() function in rsyncrosim.
Connecting R to SyncroSim using session()
The final step in setting up the R environment for the rsyncrosim workflow is to create a SyncroSim Session object in R that provides the connection to your installed copy of the SyncroSim software. A new Session is created using the session() function, in which the first argument is a path to the folder on your computer where SyncroSim has been installed. If the first argument is left blank, then the default install folder is used (Windows only).
mySession <- session("path/to/install_folder")      # Create a Session based SyncroSim install folder
mySession <- session()                              # Using default install folder (Windows only)
mySession                                           # Displays the Session object
## class : Session
## filepath [character]: C:/Program Files/SyncroSim
## silent [logical] : TRUE
## printCmd [logical] : FALSEYou can check to see which version of SyncroSim your R script is connected to by running the version() function.
version(mySession)## [1] "2.3.3"Create a modeling workflow
When creating a new modeling workflow from scratch, we need to create objects of the following scopes:
These objects are hierarchical, such that a Library can contain many Projects, and each Project can contain many Scenarios. All parameters or configurations set in a Library are inherited by all Projects within the Library, and all parameters or configurations set in a Project are inherited by all Scenarios within that Project. See below for further information on these SyncroSim objects.
Create a new Library using ssimLibrary()
A SyncroSim Library is a file (with .ssim extension) that stores all of your model inputs and outputs. The format of each SyncroSim Library is unique to the SyncroSim Package with which it is associated. We use the ssimLibrary() function to create a new SsimLibrary object in R that is connected (through your Session) to a SyncroSim Library file.
# Create a new Library
myLibrary <- ssimLibrary(name = "helloworldLibrary.ssim",
                         session = mySession,
                         package = "helloworldTime")

# Check Library information
myLibrary
## class : SsimLibrary
## session [Session] : C:/Program Files/SyncroSim, printCmd=FALSE
## filepath [character] : path/to/helloworldLibrary.ssim
## datasheetNames [data.frame]: scope,package,name,displayName,isSingle,isOutputWe can also use the ssimLibrary() function to open an existing Library. For instance, now that we have created a Library called “helloworldLibrary.ssim”, we would simply specify that we want to open this Library using the name argument. Note that if you want to create a new Library file with an existing Library name rather than opening the existing Library, you can use overwrite=TRUE for the ssimLibrary() function.
# Open existing Library
myLibrary <- ssimLibrary(name = "helloworldLibrary.ssim")
Note that if you want to create a new Library file with an existing Library name rather than opening the existing Library, you can use overwrite=TRUE for the ssimLibrary() function.
Open a Project using project()
Each SyncroSim Library contains one or more SyncroSim Projects, each represented by a Project object in R. Projects typically store model inputs that are common to all your Scenarios. In most situations you will need only a single Project for your Library; by default each new Library starts with a single Project named “Definitions” (with a unique projectId= 1). The project() function is used to both create and retrieve Projects. Note that the ssimObject here can be the name of a Library or Scenario.
# Open existing Project
myProject = project(ssimObject = myLibrary, project = "Definitions")  # Using name for Project
myProject = project(ssimObject = myLibrary, project = 1)              # Using projectId for Project

# Check Project information
myProject
## class : Project
## projectId [numeric] : 1
## session [Session] : C:/Program Files/SyncroSim, printCmd=FALSE
## filepath [character] : path/to/helloworldLibrary.ssim
## datasheetNames [data.frame]: scope,package,name,displayName,isSingle,isOutput
Create a new Scenario using scenario()
Finally, each SyncroSim Project contains one or more Scenarios, each represented by a Scenario object in R.
Scenarios store the specific inputs and outputs associated with each Transformer in SyncroSim. SyncroSim models can be broken down into one or more of these Transformers. Each Transformer essentially runs a series of calculations on the input data to transform it into the output data. Scenarios can contain multiple Transformers connected by a series of Pipelines, such that the output of one Transformer becomes the input of the next.
Each Scenario can be identified by its unique scenarioId. The scenario() function is used to both create and retrieve Scenarios. Note that the ssimObject here can be the name of a Library or a Project.
# Create a new Scenario (associated with the default Project)
myScenario = scenario(ssimObject = myProject, scenario = "My first scenario")

# Check Scenario information
myScenario
## class : Scenario
## projectId [numeric] : 1
## scenarioId [numeric] : 1
## parentId [numeric] : 0
## breakpoints [list] :
## session [Session] : C:/Program Files/SyncroSim, printCmd=FALSE
## filepath [character] : path/to/helloworldLibrary.ssim
## datasheetNames [data.frame]: scope,package,name,displayName,isSingle,isOutput
View model inputs using datasheet()
Each SyncroSim Library contains multiple SyncroSim Datasheets. A SyncroSim Datasheet is simply a table of data stored in the Library, and they represent the input and output data for Transformers. Datasheets each have a scope: either Library, Project, or Scenario. Datasheets with a Library scope represent data that is specified only once for the entire Library, such as the location of the backup folder. Datasheets with a Project scope represent data that are shared over all Scenarios within a Project. Datasheets with a Scenario scope represent data that must be specified for each generated Scenario. We can view Datasheets of varying scopes using the datasheet() function from rsyncrosim.
# View all Datasheets associated with a Library, Project, or Scenario
datasheet(myScenario)
## scope name displayName
## 1 scenario helloworldTime_InputDatasheet InputDatasheet
## 2 scenario helloworldTime_OutputDatasheet OutputDatasheet
## 3 scenario helloworldTime_RunControl Run ControlIf we want to see more information about each Datasheet, such as the scope of the Datasheet or if it only accepts a single row of data, we can set the optional argument to FALSE.
datasheet(myScenario, optional = TRUE)## scope package name displayName
## 1 scenario helloworldTime helloworldTime_InputDatasheet InputDatasheet
## 2 scenario helloworldTime helloworldTime_OutputDatasheet OutputDatasheet
## 3 scenario helloworldTime helloworldTime_RunControl Run Control
## isSingle isOutput data scenario
## 1 TRUE FALSE FALSE 1
## 2 FALSE FALSE FALSE 1
## 3 TRUE FALSE FALSE 1From this output we can see the the RunControl Datasheet and InputDatasheet only accept a single row of data (i.e. isSingle = TRUE). This is something to consider when we configure our model inputs.
To view a specific Datasheet rather than just a data frame of available Datasheets, set the name parameter in the datasheet() function to the name of the Datasheet you want to view. The general syntax of the name is: "<name of package>_<name of Datasheet>". From the list of Datasheets above, we can see that there are 3 Datasheets specific to the helloworldTime package.
# View the input Datasheet for the Scenario
datasheet(myScenario, name = "helloworldTime_InputDatasheet")
## [1] m b
## <0 rows> (or 0-length row.names)Here, we are viewing the contents of a SyncroSim Datasheet as an R data frame. Although both SyncroSim Datasheets and R data frames are both represented as tables of data with predefined columns and an unlimited number of rows, the underlying structure of these tables differ.
Configure model inputs using datasheet() and addRow()
Currently our input Scenario Datasheets are empty! We need to add some values to our input Datasheet (InputDatasheet) so we can run our model. First, assign the input Datasheet to a new data frame variable.
# Assign contents of the input Datasheet to an R data frame
myInputDataframe <- datasheet(myScenario,
                              name = "helloworldTime_InputDatasheet")
Now, check the columns that need input values and the type of values these columns require (e.g. string, numeric, logical) using the str() base R function.
# Check the columns of the input data frame
str(myInputDataframe)
## 'data.frame': 0 obs. of 2 variables:
## $ m: num
## $ b: numThe input Datasheet requires 2 values:
-
m: the slope of the linear equation. -
b: the intercept of the linear equation.
Now we will update the input data frame. This can be done in many ways (e.g. using the dplyr package), but rsyncrosim also provides a helper function called addRow() for easily adding new rows to R data frames. The addRow() function takes the targetDataframe as the first value (in this case, our input data frame that we want to update), and the data frame of new rows to append to the input data frame as the second value.
Note that in the previous section we discovered that the input Datasheets only accept a single row of values, so we can only have one value each for our slope (m) and intercept (b).
# Create input data and add it to the input data frame
myInputRow <- data.frame(m = 3, b = 10)
myInputDataframe <- addRow(myInputDataframe, myInputRow)

# Check values
myInputDataframe
## m b
## 1 3 10
Saving modifications to Datasheets using saveDatasheet()
Now that we have a complete data frame of input values, we will save this data frame to a SyncroSim Datasheet using the saveDatasheet() function. We can save our Datasheet at the Library, Project, or Scenario level, but in this case we will save it at the Scenario level.
# Save input R data frame to a SyncroSim Datasheet
saveDatasheet(ssimObject = myScenario, data = myInputDataframe,
              name = "helloworldTime_InputDatasheet")
## Datasheet <helloworldTime_InputDatasheet> saved
Configuring the RunControl Datasheet
There is one other Datasheet that we need to configure for our package to run. The RunControl Datasheet provides information about how many time steps to use in the model. Here, we set the minimum and maximum time steps for our model. We’ll add this information to an R data frame and then add it to the Run Control Datasheet using addRow(). We need to specify data for the following 2 columns:
-
MinimumTimestep: the starting time point of the simulation. -
MaximumTimestep: the end time point of the simulation.
# Assign contents of the run control Datasheet to an R data frame
runSettings <- datasheet(myScenario, name = "helloworldTime_RunControl")

# Check the columns of the run control data frame
str(runSettings)
## 'data.frame': 0 obs. of 2 variables:
## $ MinimumTimestep: num
## $ MaximumTimestep: num
# Create run control data and add it to the run control data frame
runSettingsRow <- data.frame(MinimumTimestep = 1,
                             MaximumTimestep = 10)
runSettings <- addRow(runSettings, runSettingsRow)

# Check values
runSettings
## MinimumTimestep MaximumTimestep
## 1 1 10
# Save run control R data frame to a SyncroSim Datasheet
saveDatasheet(ssimObject = myScenario, data = runSettings,
              name = "helloworldTime_RunControl")
## Datasheet <helloworldTime_RunControl> savedRun Scenarios
Setting run parameters with run()
We will now run our Scenarios using the run() function in rsyncrosim, starting with the first Scenario we created (“My first scenario”).
# Run the first Scenario we created
myResultScenario <- run(myScenario)
## [1] "Running scenario [1] My first scenario"
Checking the run log with runLog()
For more information use the runLog() function, in which the only argument is the result Scenario variable.
# Get run details for the first result Scenario
runLog(myResultScenario)
## Run Log
## STARTING SIMULATION: 2021-09-07 : 1:32:54 PM
##
## Parent Scenario is: [1] My first scenario
## Result scenario is: [2] My first scenario ([1] @ 07-Sep-2021 1:32 PM)
##
## CONFIGURING: Primary
##
## RUNNING: Primary
##
## SIMULATION COMPLETE: 2021-09-07 : 1:33:02 PM
## Total simulation time: 00:00:07## [1] "Run Log \nSTARTING SIMULATION: 2021-09-07 : 1:32:54 PM\n\nParent Scenario is: [1] My first scenario\nResult scenario is: [2] My first scenario ([1] @ 07-Sep-2021 1:32 PM)\n\nCONFIGURING: Primary\n\nRUNNING: Primary\n\nSIMULATION COMPLETE: 2021-09-07 : 1:33:02 PM\nTotal simulation time: 00:00:07 "View results
Results Scenarios
A Results Scenario is generated when a Scenario is run, and is an exact copy of the original Scenario (i.e. it contains the original Scenario’s values for all input Datasheets). The Results Scenario is passed to the Transformer in order to generate model output, with the results of the Transformer’s calculations then being added to the Results Scenario as output Datsheets. In this way the Results Scenario contains both the output of the run and a snapshot record of all the model inputs.
Check out the current Scenarios in your Library using the scenario() function.
# Check Scenarios that currently exist in your Library
scenario(myLibrary)
## scenarioId projectId name isResult
## 1 1 1 My first scenario No
## 2 2 1 My first scenario ([1] @ 07-Sep-2021 1:32 PM) Yes
## parentID owner lastModified readOnly mergeDependencies
## 1 NA N/A 2021-09-07 at 1:32 PM No No
## 2 1 N/A 2021-09-07 at 1:33 PM No No
## ignoreDependencies autoGenTags
## 1 NA NA
## 2 NA NAThe first Scenario is our original Scenario, and the second is the Results Scenario with a time and date stamp of when it was run. We can also see some other information about these Scenarios, such as whether or not the Scenario is a result or not (i.e. isResult column).
We can also look at how the Datasheets differ between the Results Scenario and the original Scenario using the datasheet() function.
# Take a look at original Scenario Datasheets
datasheet(myScenario, optional = TRUE)
## scope package name displayName
## 1 scenario helloworldTime helloworldTime_InputDatasheet InputDatasheet
## 2 scenario helloworldTime helloworldTime_OutputDatasheet OutputDatasheet
## 3 scenario helloworldTime helloworldTime_RunControl Run Control
## isSingle isOutput data scenario
## 1 TRUE FALSE TRUE 1
## 2 FALSE FALSE FALSE 1
## 3 TRUE FALSE TRUE 1
# Take a look at Results Scenario Datasheets
datasheet(myResultScenario, optional = TRUE)
## scope package name displayName
## 1 scenario helloworldTime helloworldTime_InputDatasheet InputDatasheet
## 2 scenario helloworldTime helloworldTime_OutputDatasheet OutputDatasheet
## 3 scenario helloworldTime helloworldTime_RunControl Run Control
## isSingle isOutput data scenario
## 1 TRUE FALSE TRUE 1
## 2 FALSE FALSE TRUE 1
## 3 TRUE FALSE TRUE 1Looking at the data column, the OutputDatasheet does not contain any data in the original Scenario, but does in the Results Scenario.
Viewing results with datasheet()
The next step is to view the output Datasheets added to the Result Scenario when it was run. We can load the result tables using the datasheet() function, and setting the name parameter to the Datasheet with new data added.
# Results of first Scenario
resultsSummary <- datasheet(myResultScenario,
                            name = "helloworldTime_OutputDatasheet")

# View results table
head(resultsSummary)
## Timestep y
## 1 1 13
## 2 2 16
## 3 3 19
## 4 4 22
## 5 5 25
## 6 6 28Working with multiple Scenarios
You may want to test multiple alternative Scenarios that have slightly different inputs. To save time, you can copy a Scenario that you’ve already made, give it a different name, and modify the inputs. To copy a completed Scenario, use the scenario() function with the sourceScenario argument set to the name of the Scenario you want to copy.
# Check which Scenarios you currently have in your Library
scenario(myLibrary)['name']
## name
## 1 My first scenario
## 2 My first scenario ([1] @ 07-Sep-2021 1:32 PM)
# Create a new Scenario as a copy of an existing Scenario
myNewScenario <- scenario(ssimObject = myProject,
                          scenario = "My second scenario",
                          sourceScenario = myScenario)

# Make sure this new Scenario has been added to the Library
scenario(myLibrary)['name']
## name
## 1 My first scenario
## 2 My first scenario ([1] @ 07-Sep-2021 1:32 PM)
## 3 My second scenarioTo edit the new Scenario, we must first load the contents of the input Datasheet and assign it to a new R data frame using the datasheet() function. We will set the empty argument to TRUE so that instead of getting the values from the existing Scenario, we can start with an empty data frame again.
# Load empty input Datasheets as an R data frame
myNewInputDataframe <- datasheet(myNewScenario,
                                 name = "helloworldTime_InputDatasheet",
                                 empty=TRUE)

# Check that we have an empty data frame
str(myNewInputDataframe)
## 'data.frame': 0 obs. of 2 variables:
## $ m: num
## $ b: numNow, all we need to do is add our data frame of values the same way we did before, using the addRow() function.
# Create input data and add it to the input data frame
newInputRow <- data.frame(m = 4, b = 10)
myNewInputDataframe <- addRow(myNewInputDataframe, newInputRow)

# View the new inputs
myNewInputDataframe
## m b
## 1 4 10Finally, we will save the updated data frame to a SyncroSim Datasheet using saveDatasheet().
# Save R data frame to a SyncroSim Datasheet
saveDatasheet(ssimObject = myNewScenario, data = myNewInputDataframe,
              name = "helloworldTime_InputDatasheet")
## Datasheet <helloworldTime_InputDatasheet> savedWe will keep the RunControl Datasheet the same as the first Scenario.
Run Scenarios
We now have two SyncroSim Scenarios. We can run all the Scenarios in our Project at once by telling run() which Project to use and including a vector of Scenarios in the scenario argument.
# Run all Scenarios
myResultScenarioAll <- run(myProject,
                           scenario = c("My first scenario",
                                        "My second scenario"))
## [1] "Running scenario [1] My first scenario"
## [1] "Running scenario [3] My second scenario"View Results
The output that is returned from running many Scenarios at once is actually a list of result Scenario objects. To view the results, we can still use the datasheet() function, we just need to index for the result Scenario object we are interested in.
datasheet(myResultScenarioAll[2], name = "OutputDatasheet")## Timestep y
## 1 1 14
## 2 2 18
## 3 3 22
## 4 4 26
## 5 5 30
## 6 6 34
## 7 7 38
## 8 8 42
## 9 9 46
## 10 10 50
Identifying the parent Scenario of a Results Scenario using parentId()
If you have many alternative Scenarios and many Results Scenarios, you can always find the parent Scenario that was run in order to generate the Results Scenario using the rsyncrosim function parentId().
parentId(myResultScenarioAll[[1]])## [1] 1
parentId(myResultScenarioAll[[2]])## [1] 3Access model metadata
Getting Library information using info()
Retrieve Library information:
info(myLibrary)## property value
## 1 Name: helloworldLibrary
## 2 Owner: N/A
## 3 Last Modified: 2021-09-07 at 1:33 PM
## 4 Size: 188 KB (192,512 B)
## 5 Read Only: No
## 6 Package Name: helloworldTime
## 7 Package Description: Example demonstrating how to use timesteps
## 8 Current Package Version: 1.0.0
## 9 Minimum Package Version: 1.0.0
## 10 External input files: helloworldLibrary.ssim.input
## 11 External output files: helloworldLibrary.ssim.output
## 12 Temporary files: helloworldLibrary.ssim.temp
## 13 Backup files: helloworldLibrary.ssim.backupGetting information of any ssimObject
The following functions can be used to get useful information about a Library, Project, or Scenario:
-
name(): used to retrieve or assign a name -
owner(): used to retrieve or assign an owner -
dateModified(): used to retrieve the date when the last changes were made -
readOnly(): used to retrieve or assign the read-only status -
filepath(): retrieve local file path -
description(): retrieve or add a description
You can also find identification numbers of Projects or Scenarios using the following functions:
-
projectID(): used to retrieve the Project identification number -
scenarioID(): used to retrieve the Scenario identification number
Backup your Library
Once you have finished running your models, you may want to backup the inputs and results into a zipped .backup subfolder. First, we want to modify the Library Backup Datasheet to allow the backup of model outputs. Since this Datasheet is part of the built-in SyncroSim core, the name of the Datasheet has the prefix “core”.
# Get the current values for the Library's Backup Datasheet
sheetData <- datasheet(myLibrary, name = "core_Backup")

# View current values for the Library's Backup Datasheet
sheetData
## IncludeInput IncludeOutput BeforeUpdate
## 1 TRUE NA TRUE
# Add output to the Library's Backup Datasheet and save
sheetData$IncludeOutput <- TRUE
saveDatasheet(myLibrary, data = sheetData, name = "core_Backup")
## Datasheet <core_Backup> saved
# Check to make sure IncludeOutput is now TRUE
datasheet(myLibrary, "core_Backup")
## IncludeInput IncludeOutput BeforeUpdate
## 1 TRUE TRUE TRUENow, you can use the backup() function from rsyncrosim to backup a Library, Project, or Scenario.
backup(myLibrary)## Backup complete.
rsyncrosim and the SyncroSim Windows User Interface
It can be useful to work in both rsyncrosim and the SyncroSim Windows User Interface at the same time. You can easily modify Datasheets and run Scenarios in rsyncrosim, while updating the Library and plotting outputs in the User Interface. To sync the Library in the User Interface with the latest changes from the rsyncrosim code, click the refresh icon in the upper tool bar of the User Interface.
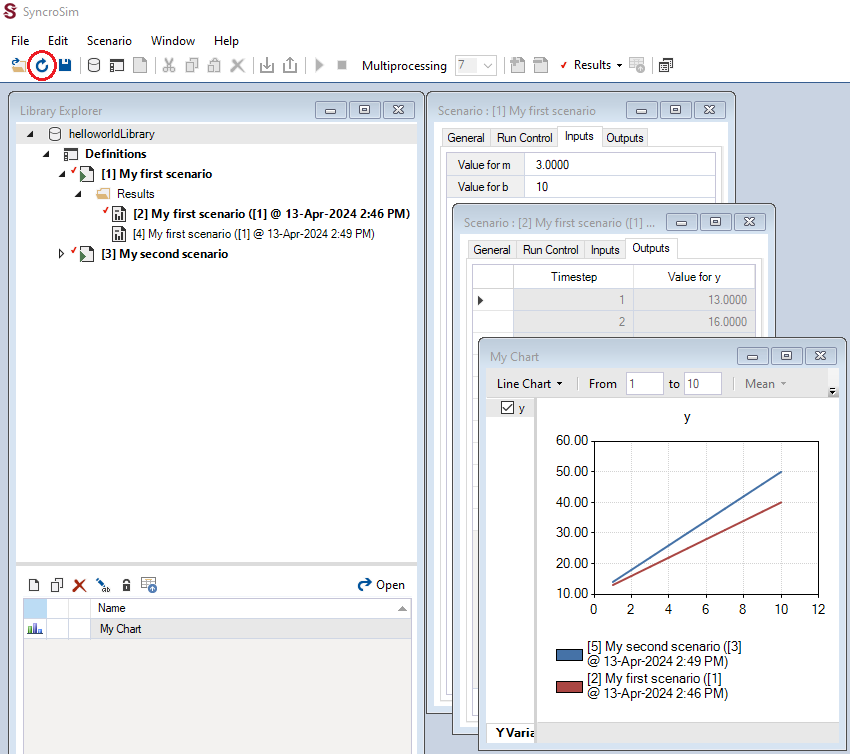
Using rsyncrosim with the SyncroSim Windows User Interface